As times goes on and knowledge is gained, I find myself more and more making little lifestyle changes. An example of this was the switch from margarine to butter. Years ago a friend was going on and on about how margarine is a molecule away from a yoga mat - or some such thing - and I remember doing a little research and read enough to agree (even though I did not want to!) - the change was made and we never looked back. Once one knows the truth - it is hard to ignore. Especially, if the health of the children is involved.
We love candles and before we had children a trip to a very well known candle store was a weekly thing. Then the babies came and kids and open flames do not mix - as any parent knows. So candles became a thing of the past. Then the plug in wax warmer came on the scene. Next a direct sales company took the wax melt industry by storm. All those amazing scents for every mood and occasion. Yes please!!!
Then a friend (not the margarine = yoga mat friend) starting going on and on about how we (and the kids) were breathing in petroleum or some such fuel derivative. That most candle and wax melts are paraffin (a product of petroleum refining from the waste when crude oil is refined into gasoline). Lovely right??!! So once again I really did not want to hear it - I love my wax melts!! more than I loved my margarine.
However the voice of reason raised its ugly little head and I did some research. Ever wonder why when you blow out a candle in a jar there is black soot and residue left behind - remember that very distinguished "just blew out a candle" smell? Well that is what happens when one is burning a crude oil by product. Melting paraffin in a warmer is also releasing all that unhealthiness into the air for the family to breathe in. I encourage everyone to do their own research and draw their own conclusions. That direct sales company I eluded to before is doing some serious damage control so there can be some confusing information on the net so check your sources.
So that brings me to my alternative -I did not want to give up my love of scents. So we switched to soy melts. The scent lasts so much longer than paraffin wax and my family can breathe easier with a natural product. We love soy melts so much we now make our own.
Have you made any lifestyle changes after learning something was harmful to your health? Please share - I might learn something that causes another change here too!
We are a micro farm! A great way to live a farm life on a small amount of land. Striving for a self sufficient homesteading lifestyle seasoned with a heavy dose of convenience. We are rearing 3 rambunctious boys and raising rabbits and Pekin ducks. We are kept entertained by our rescued Olde English Bulldogges - Blaze and Raven. We hope you will be amused and enlightened as well as we traverse everyday life and micro-farming.
Monday, December 22, 2014
Sunday, June 22, 2014
Getting Back in the Saddle
So much has happened in the last year. Long story short we had to move to a new property due to a less then honest real estate deal we were in with a local mortgage company. After consulting attorneys we realized that we needed to follow the painful but realistic advice to walk away from our little farm. Lesson learned - even if the other party is in breach of contract it can require more in resources to enforce it than it may be worth in the end. So we are now on a smaller piece of property and starting over from scratch. It was very difficult to dismantle what we had worked so hard to build. Depressing in fact and I really lost heart for quite a while. However, I am pulling up my bootstraps and getting to it!
Due to close proximity of neighbors we will have no roosters, so instead of chickens we are getting ready for Pekin Ducks! We had them before and loved them. Duck eggs are fabulous for baking and Pekin is also a great meat option.
We are also slowly rebuilding our rabbitry - we currently have a New Zealand doe that has been bred to a Sinatra buck - so stay tuned for kit updates. We also have a small herd of pedigreed Lionheads - 2 does have been bred and we should have some Show Quality kits.
Our 3 little boys have a small herd of cavy (guinea pigs) also pedigreed - so we will eventually have some Peruvian babies :-)
Half of the new property is being cleared by "Mr. Clover" and it is going to also require many loads of clean fill but we are working on one area at a time. The new bunny barn is first priority and will be done within the month.
I apologize for starting this blog and not sticking to it. I intend to be more diligent from here on out!
Due to close proximity of neighbors we will have no roosters, so instead of chickens we are getting ready for Pekin Ducks! We had them before and loved them. Duck eggs are fabulous for baking and Pekin is also a great meat option.
We are also slowly rebuilding our rabbitry - we currently have a New Zealand doe that has been bred to a Sinatra buck - so stay tuned for kit updates. We also have a small herd of pedigreed Lionheads - 2 does have been bred and we should have some Show Quality kits.
Our 3 little boys have a small herd of cavy (guinea pigs) also pedigreed - so we will eventually have some Peruvian babies :-)
Half of the new property is being cleared by "Mr. Clover" and it is going to also require many loads of clean fill but we are working on one area at a time. The new bunny barn is first priority and will be done within the month.
I apologize for starting this blog and not sticking to it. I intend to be more diligent from here on out!
Wednesday, September 11, 2013
Easy Peasy Bread Machine Jam
A some of you have probably surmised by now - I love gadgets! - especially kitchen gadgets. I believe that if something makes life easier then of course! Having 3 little ones as well as the poultry flocks and the rabbitry, I cannot be tied to the stove stirring and watching for hours at a time.
So I am very happy to make my jam in the bread machine - or I should say - have the bread machine (all 3 of them) make jam for me -Yeah!! I purchased all 3 of my bread machines second hand and all work great. Make sure your machine has the "Jam" setting button - it usually near the bottom of the menu.
Having tried many recipes for bread machine jam, I found them pretty much all to be too sweet for my liking. Fruit and berries are already sweet and I want to taste the fruit/berry of choice. So after researching, tweaking and trying here goes!!
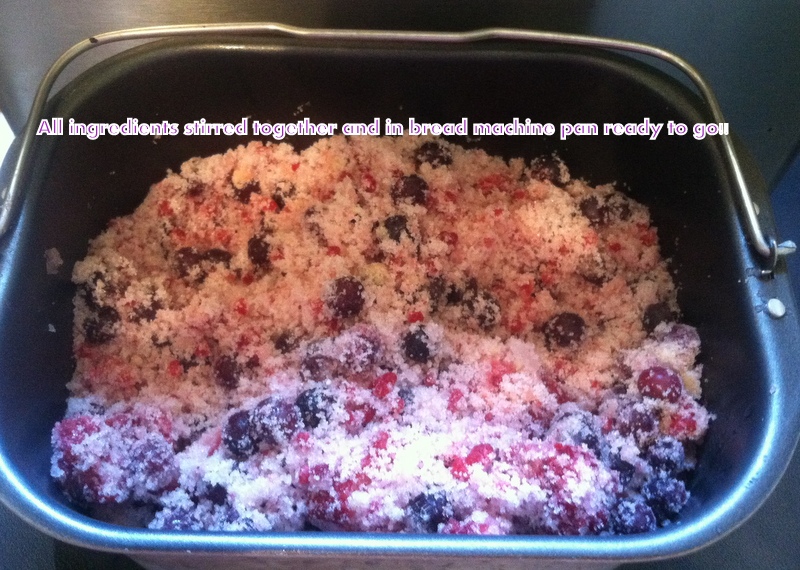
This time I made "Jamboree Jam" using frozen berries - I had about 1/2 # of raspberries (from Wee Acre Farm) and 1/2# of strawberries and I added 1# of blueberries (also from Wee Acre Farm).
**Note: If your bread machine has a 2# loaf capability then by all means double this baby!! :-) I did!!
Prepare the fruit as appropriate - wash, hull and chop into small pieces (ie apples/peaches) or smash (ie berries) Using just a fork will work just fine. For this batch I cut the larger strawberries into quarters and smaller ones in half.
Add into the fruit/berries the pectin, lemon juice and sugar -stir it up! Pour the mixture into the bread pan and place into the bread machine and select "Jam" cycle. That's it!
(Now go flip laundry - load the dishwasher - strip the beds -vacuum - feed the cat - gather the eggs - prep dinner - get the oil changed in the minivan -(or in my case go work on a paper due in a few days) you get my drift ;-)
When cycle is complete - remove the pan from the bread machine and allow to cool for a bit before pouring into container or jars. Do not completely cool or it will set up in your bread pan.
There are two options at this point you can refrigerate and/or freeze OR hot water bath/can it.
Refrigerate for up to 3 months and freeze for up to 12 months. I chose to refrigerate this time as we will use it before 3 months are up.
Would love to know if you plan to try this or have already made jam in your bread machine.
What kind did you make and how did you like it - was it "Easy Peasy"??
So I am very happy to make my jam in the bread machine - or I should say - have the bread machine (all 3 of them) make jam for me -Yeah!! I purchased all 3 of my bread machines second hand and all work great. Make sure your machine has the "Jam" setting button - it usually near the bottom of the menu.
Having tried many recipes for bread machine jam, I found them pretty much all to be too sweet for my liking. Fruit and berries are already sweet and I want to taste the fruit/berry of choice. So after researching, tweaking and trying here goes!!
This time I made "Jamboree Jam" using frozen berries - I had about 1/2 # of raspberries (from Wee Acre Farm) and 1/2# of strawberries and I added 1# of blueberries (also from Wee Acre Farm).
**Note: If your bread machine has a 2# loaf capability then by all means double this baby!! :-) I did!!
So here's what is needed:
3 Tbsp of LOW/NO-Sugar Pectin - this is Important!
1 Tbsp Lemon Juice
1 C sugar
Prepare the fruit as appropriate - wash, hull and chop into small pieces (ie apples/peaches) or smash (ie berries) Using just a fork will work just fine. For this batch I cut the larger strawberries into quarters and smaller ones in half.
(Now go flip laundry - load the dishwasher - strip the beds -vacuum - feed the cat - gather the eggs - prep dinner - get the oil changed in the minivan -(or in my case go work on a paper due in a few days) you get my drift ;-)
When cycle is complete - remove the pan from the bread machine and allow to cool for a bit before pouring into container or jars. Do not completely cool or it will set up in your bread pan.
There are two options at this point you can refrigerate and/or freeze OR hot water bath/can it.
Refrigerate for up to 3 months and freeze for up to 12 months. I chose to refrigerate this time as we will use it before 3 months are up.
Would love to know if you plan to try this or have already made jam in your bread machine.
What kind did you make and how did you like it - was it "Easy Peasy"??
Monday, September 9, 2013
Easy Peasy Apple Butter
I am always trying to combine the old world simple lifestyle of being self sufficient mixed with a heavy dose of convenience. That is my definition of "Modern Homesteading". One of the conveniences I must have is a Slow Cooker. ( I actually have 3! Sometimes all going at once.) Right now one is making Apple Butter. I love apple butter and this time of year with fresh local apples - YUM!!
Choosing apples to make Apple Butter or Apple Sauce is really a personal choice - in my opinion. I think you pick the flavors you like and go from there. Keeping in mind that softer apples cook faster and of course the opposite for firmer apples. For this batch I used a mix of Pink Ladies, Paula Reds, Granny Smith (because it is one of my favorite) and Red Delicious (for the sweet factor).
I am new to canning "all by myself". My mother canned and I remember watching her and I am sure "helping" and I was very involved in helping my grandmother when I was older and really, actually helping.
I am very fortunate to have friends and mentors and inspiration.
Here is how I do it:
You will need:
6-7 pounds of your choice of Apples
1 Cup Sugar
1 Cup Dark Brown Sugar
1 Tbsp Ground Cinnamon
1 Tbsp Pure Vanilla Extract ( used near the end of the cooking period)
1/2 tsp. Nutmeg
1/4 tsp. Ground Cloves
1/4 tsp Salt
**A note on the ground cinnamon and ground cloves. If you have a coffee grinder (another gadget!!) buy whole cinnamon sticks and/or whole cloves and grind yourself. It is fresher and the flavor is very intense - which in Apple Butter is a very good thing. You might also notice that the freshly ground is a much darker color than the already ground package.
So - the apples need to be peeled and cored. If you have an apple peeler/corer/slicer by all means use it. I used to have one but I can't find it and will be getting another one. In the mean time I peel with a veggie peeler first and the use a apple corer/cutter thingy pictured here and then cut into small pieces:
Go ahead and put the apples into the Slow Cooker.
Measure out white and brown sugars, cinnamon, nutmeg, cloves, and salt. Combine them in a bowl (medium size will work). Pour the mixture over the apples. Set Slow Cooker to "Low" and timer for 10 hours. You will want to stir occasionally throughout this time - I do about every 2 hours but it is probably not necessary to stir even that often.
At the end of 10 hours you will want to stir in your Vanilla Extract and reset timer for 2 hours.
Now is a good time to start setting up for the canning part. Clean and sterilize jars, lids and rings. I use a roaster pan spanned across two burners. I got this idea on a canning blog and it works great.
At the end of 12 hours the apples will have cooked down and look like this:
Now - there are two options for the next step. I use an Immersion Blender (aka a hand blender) Yes - another gadget!! However, you could also use a regular counter top blender. An Immersion Blender is a great gadget - so easy to clean up after use - the bottom half twists or clicks off - depending on style and simply rinses off. You can use it right inside the Slow Cooker so you do not have to remove the cooked apples. Easy Peasy!! ( I have 2 - I got one at a lawn sale for $1 and it works great!!)
After using the immersion blender the Apple Butter looks like this - oh so yummy! Now it is ready to "jar up" and can.
Fill the jars with Apple Butter leaving about 2 inches from top. (A jar funnel comes in handy about now - you can see the blue one in the above picture with jars being sterilized.) Place your lids and tighten rings just "finger tight". Using a jar lifter, place in your hot water bath and make sure jars are covered with 2" of water. Allow to boil for about 10 minutes. Have a dish towel ready to place removed jars on. Once all jars are removed (jar lifter again) - cover with another dish towel. You want them to cool slowly. This is a tip from my good friend and mentor Ms. Polly over at Wee Acre Farm.
I made 4 pints and put the leftover in a container for us to eat right away.
And here we are - 4 pretty little pints of Easy Peasy Apple Butter!
What was the very first food you canned "all by yourself"?
Are you self taught or did you have someone teach you?
Please share all about it.
This post was shared on The Homesteaders Blog Hop http://www.modernhomesteaders.net/the-homesteaders-blog-hop-9/
Choosing apples to make Apple Butter or Apple Sauce is really a personal choice - in my opinion. I think you pick the flavors you like and go from there. Keeping in mind that softer apples cook faster and of course the opposite for firmer apples. For this batch I used a mix of Pink Ladies, Paula Reds, Granny Smith (because it is one of my favorite) and Red Delicious (for the sweet factor).
I am new to canning "all by myself". My mother canned and I remember watching her and I am sure "helping" and I was very involved in helping my grandmother when I was older and really, actually helping.
I am very fortunate to have friends and mentors and inspiration.
Here is how I do it:
You will need:
6-7 pounds of your choice of Apples
1 Cup Sugar
1 Cup Dark Brown Sugar
1 Tbsp Ground Cinnamon
1 Tbsp Pure Vanilla Extract ( used near the end of the cooking period)
1/2 tsp. Nutmeg
1/4 tsp. Ground Cloves
1/4 tsp Salt
**A note on the ground cinnamon and ground cloves. If you have a coffee grinder (another gadget!!) buy whole cinnamon sticks and/or whole cloves and grind yourself. It is fresher and the flavor is very intense - which in Apple Butter is a very good thing. You might also notice that the freshly ground is a much darker color than the already ground package.
So - the apples need to be peeled and cored. If you have an apple peeler/corer/slicer by all means use it. I used to have one but I can't find it and will be getting another one. In the mean time I peel with a veggie peeler first and the use a apple corer/cutter thingy pictured here and then cut into small pieces:
Go ahead and put the apples into the Slow Cooker.
Measure out white and brown sugars, cinnamon, nutmeg, cloves, and salt. Combine them in a bowl (medium size will work). Pour the mixture over the apples. Set Slow Cooker to "Low" and timer for 10 hours. You will want to stir occasionally throughout this time - I do about every 2 hours but it is probably not necessary to stir even that often.
At the end of 10 hours you will want to stir in your Vanilla Extract and reset timer for 2 hours.
Now is a good time to start setting up for the canning part. Clean and sterilize jars, lids and rings. I use a roaster pan spanned across two burners. I got this idea on a canning blog and it works great.
At the end of 12 hours the apples will have cooked down and look like this:
Now - there are two options for the next step. I use an Immersion Blender (aka a hand blender) Yes - another gadget!! However, you could also use a regular counter top blender. An Immersion Blender is a great gadget - so easy to clean up after use - the bottom half twists or clicks off - depending on style and simply rinses off. You can use it right inside the Slow Cooker so you do not have to remove the cooked apples. Easy Peasy!! ( I have 2 - I got one at a lawn sale for $1 and it works great!!)
After using the immersion blender the Apple Butter looks like this - oh so yummy! Now it is ready to "jar up" and can.
Fill the jars with Apple Butter leaving about 2 inches from top. (A jar funnel comes in handy about now - you can see the blue one in the above picture with jars being sterilized.) Place your lids and tighten rings just "finger tight". Using a jar lifter, place in your hot water bath and make sure jars are covered with 2" of water. Allow to boil for about 10 minutes. Have a dish towel ready to place removed jars on. Once all jars are removed (jar lifter again) - cover with another dish towel. You want them to cool slowly. This is a tip from my good friend and mentor Ms. Polly over at Wee Acre Farm.
I made 4 pints and put the leftover in a container for us to eat right away.
And here we are - 4 pretty little pints of Easy Peasy Apple Butter!
What was the very first food you canned "all by yourself"?
Are you self taught or did you have someone teach you?
Please share all about it.
This post was shared on The Homesteaders Blog Hop http://www.modernhomesteaders.net/the-homesteaders-blog-hop-9/
Sunday, September 8, 2013
Juicing Adventure 1
So we recently got a juicer. I have been wanting one for a long time. I have never purchased juice as a regular drink option for my kids. It is horrible for them and thankfully they never asked for it. They have it sometimes and of course at others homes.
I do worry about them getting their "daily dose" of vitamins and minerals needed and have always given them a daily vitamin - but I highly suspect the benefit. It is mass manufactured and how old is it before my kid is popping it in his mouth on the way to the school bus?
So juicing is the answer for us - for now anyway. I am learning about what each fruit and veggie add as a health benefit and what combos are best for different needs - Energy, Weight Loss, Overall Wellness etc etc. There is a lot to learn! One of the great things - as many already know - most of the "goodness"is found in the peelings. No one eats the peelings - but with a juicer you don't miss out on the healthiest part!
So we dove in this morning and had our first of many more to come fresh juice. Here is the recipe we came up with - slight modified from one that came with the juicer. I want the kids to like it of course so that may mean some tweaking of some recipes. This one is a keeper! I call it:
"Morning Rush"
1 Medium Apple
1 Small Cucumber
3 Medium Carrots
3 Peeled Oranges
I do worry about them getting their "daily dose" of vitamins and minerals needed and have always given them a daily vitamin - but I highly suspect the benefit. It is mass manufactured and how old is it before my kid is popping it in his mouth on the way to the school bus?
So juicing is the answer for us - for now anyway. I am learning about what each fruit and veggie add as a health benefit and what combos are best for different needs - Energy, Weight Loss, Overall Wellness etc etc. There is a lot to learn! One of the great things - as many already know - most of the "goodness"is found in the peelings. No one eats the peelings - but with a juicer you don't miss out on the healthiest part!
So we dove in this morning and had our first of many more to come fresh juice. Here is the recipe we came up with - slight modified from one that came with the juicer. I want the kids to like it of course so that may mean some tweaking of some recipes. This one is a keeper! I call it:
"Morning Rush"
1 Medium Apple
1 Small Cucumber
3 Medium Carrots
3 Peeled Oranges
Friday, September 6, 2013
Preparing for Jack Frost - Winterizing the Coop
Jack Frost comes at different times every year which I find to be completely faux pas. A little consistency would be highly appreciated but alas he has proven an incorrigible rogue. So we must start preparing for his possible and likely untimely arrival.
One of the first things we do is thoroughly inspect the coops for any possible predator entrances - a fisher - for example - only needs a very small opening to squeeze into. I know someone who had a small hole drilled into the side of her coop just big enough for the plug part of extension cord to fit through - she removed the extension cord and a fisher used it it gain entrance and you can imagine the outcome.
We also do one last really good cleaning and put in our anti-mite shaving mixture (See here for more details on what is included Northern Fowl Mites). Nest boxes are continuously cleaned as needed of course. We use the deep litter method here. It works for us and as long as we keep layering properly there is no smell, no dampness and no mite issues. The heat produced keeps the flock toasty warm and keeps us from adding any heat lamps - which I know many do and we have as well for young birds - but I always worry about fire.
Another thought process that I subscribe to is that birds acclimate as the weather changes. I read a really great post on a poultry forum from a flock keeper in Alaska - she has never added heat to her coops. She actually felt doing so caused more harm than good. I tend to agree and one reason is - if the flock is used to supplemented heat and a nor'easter comes along and knocks out the power - and it does happen often where we are - the flock is going to be in real trouble! I would be bringing them in the house!!
Another thing I have seen is that many do not realize that the roost should be flat and wide - not round - strapping makes great roosts or even 2x4's installed with the flat side up as the roost. This way birds settle down and their legs and feet are fully covered with fluffy feathers and they are not "teeter tottering" to keep their balance which constantly exposes them to blasts of cold air.
For our smaller coops we use either straw or leaf filled bags (a good use for all the raked leaves that will be here in only moments) as insulation around the outside. I highly caution against using hay - as I have mentioned in previous posts - hay is an invitation to mites.
Diet needs will change as well - free ranged birds will no longer have that option and hot grains are added for warmth. We increase both cracked corn and BOSS at this time of year. Cracked corn and BOSS both will raise the internal temp of the bird. It is a good plan to give these grains in the evening right before roosting for two reasons. First it is of course colder at night and they need the extra boost and secondly it will be out of the system for egg laying the next day. The rise in temperature can impede egg production - we feed very little cracked corn in the summer months because of this. Alfalfa pellets are also added to the feed mix and alfalfa cubes soaked in warm water make a nice green option. A bowl of warm oatmeal with meal worms mixed in is another fantastic winter time treat.
If you have white birds - feeding them extra cracked corn can turn their plumage yellow. I forgot to convey this to "Mr. Clover" last winter in regards to my SQ White Silkie Roo - and I was panicked once I realized he was turning yellow as I was certain he was ruined for the spring bird club show. I bathed and bathed him to get that yellow out. In the end he took 3rd but I swear I could still see a yellow hue. So instead my white birds that I want to stay white get a mix of mostly BOSS with some cracked corn. We start stocking up as soon as possible as grain prices do tend to raise in winter months.
We also use a raised bin watering system instead of the regular waterers. They are easier to knock out ice and refill. Heated water bowls meant for dogs are also another option - we have one for our larger laying flock. I encourage that any open waterers be raised up (perhaps on cinder blocks) so that no waddles are dipped as this can lead to frostbite quickly. There are heated chicken waterers available out there and one day I hope to be able to get one for every coop - but until then we do what works for us now.
These are just a few of the things we do here at Clover Run and we would love to hear what you do. I am sure there are many different tips and processes that we can all learn from.
One of the first things we do is thoroughly inspect the coops for any possible predator entrances - a fisher - for example - only needs a very small opening to squeeze into. I know someone who had a small hole drilled into the side of her coop just big enough for the plug part of extension cord to fit through - she removed the extension cord and a fisher used it it gain entrance and you can imagine the outcome.
We also do one last really good cleaning and put in our anti-mite shaving mixture (See here for more details on what is included Northern Fowl Mites). Nest boxes are continuously cleaned as needed of course. We use the deep litter method here. It works for us and as long as we keep layering properly there is no smell, no dampness and no mite issues. The heat produced keeps the flock toasty warm and keeps us from adding any heat lamps - which I know many do and we have as well for young birds - but I always worry about fire.
Another thought process that I subscribe to is that birds acclimate as the weather changes. I read a really great post on a poultry forum from a flock keeper in Alaska - she has never added heat to her coops. She actually felt doing so caused more harm than good. I tend to agree and one reason is - if the flock is used to supplemented heat and a nor'easter comes along and knocks out the power - and it does happen often where we are - the flock is going to be in real trouble! I would be bringing them in the house!!
Another thing I have seen is that many do not realize that the roost should be flat and wide - not round - strapping makes great roosts or even 2x4's installed with the flat side up as the roost. This way birds settle down and their legs and feet are fully covered with fluffy feathers and they are not "teeter tottering" to keep their balance which constantly exposes them to blasts of cold air.
For our smaller coops we use either straw or leaf filled bags (a good use for all the raked leaves that will be here in only moments) as insulation around the outside. I highly caution against using hay - as I have mentioned in previous posts - hay is an invitation to mites.
Diet needs will change as well - free ranged birds will no longer have that option and hot grains are added for warmth. We increase both cracked corn and BOSS at this time of year. Cracked corn and BOSS both will raise the internal temp of the bird. It is a good plan to give these grains in the evening right before roosting for two reasons. First it is of course colder at night and they need the extra boost and secondly it will be out of the system for egg laying the next day. The rise in temperature can impede egg production - we feed very little cracked corn in the summer months because of this. Alfalfa pellets are also added to the feed mix and alfalfa cubes soaked in warm water make a nice green option. A bowl of warm oatmeal with meal worms mixed in is another fantastic winter time treat.
If you have white birds - feeding them extra cracked corn can turn their plumage yellow. I forgot to convey this to "Mr. Clover" last winter in regards to my SQ White Silkie Roo - and I was panicked once I realized he was turning yellow as I was certain he was ruined for the spring bird club show. I bathed and bathed him to get that yellow out. In the end he took 3rd but I swear I could still see a yellow hue. So instead my white birds that I want to stay white get a mix of mostly BOSS with some cracked corn. We start stocking up as soon as possible as grain prices do tend to raise in winter months.
We also use a raised bin watering system instead of the regular waterers. They are easier to knock out ice and refill. Heated water bowls meant for dogs are also another option - we have one for our larger laying flock. I encourage that any open waterers be raised up (perhaps on cinder blocks) so that no waddles are dipped as this can lead to frostbite quickly. There are heated chicken waterers available out there and one day I hope to be able to get one for every coop - but until then we do what works for us now.
These are just a few of the things we do here at Clover Run and we would love to hear what you do. I am sure there are many different tips and processes that we can all learn from.
Thursday, September 5, 2013
What I have learned so far.......
I did a lot of research in the 2 years leading up to starting this MicroFarm. From the name to the animals and crops - I had/have it all mapped out. Everyone will have different goals as to what they want to achieve. Ours is to have a profitable MicroFarm and to be self sufficient - "within reason". I always add that because the term "self sufficient" can conjure up many different ideas. We are not "doomsday preppers". I do not think we will wake one day to find only a small populous left to fight to the bitter end etc etc. I do however feel that factory farming has done irreparable harm to our health as a society. Our thought processes and lack of education regarding our food is actually horrifying. What we as a nation have accepted regarding our food sources is shocking. The head in the sand mentality has to stop. Our children's lifespan depends on it.
So "within reason" for us means that we can provide healthy food options for our family, teach our children where food really comes from and the difference between such things like store bought eggs and our fresh farm eggs. How there is a moral issue in factory farmed animals and that we as caretakers of the animal kingdom have sadly lost our way as a whole. What we do believe is, that a natural disaster or terrorist attack could occur to stop the trucking in of goods - if that happened - how long could you feed your family from your freezer and pantry? Would you know who to locate for fresh milk and eggs in your community? Not everyone is as fortunate to live where these options exist in multitude and we are very thankful that we do.
I read so many books and online articles and videos - Harvey Ussery, Joel Salatin, Mel Bartholomew, Brett Markham and Gail Damerow are just a few of the authors whose wisdom I filled my head with.
I spent my teenage years on an agriculture farm - not huge but not small - my grandfather was well known in our neck of the woods for his large crops of 1/2 runner green beans, fabulous sweet corn (Silver Queen and Peaches n' Cream were my favorites) and Potatoes among other crops. He also kept bees and my cousins and I grew up chewing on fresh honeycomb - not realizing how fortunate we were and what a novelty it would be to most.
Calls from those wanting to get their orders in would come while snow was still on the ground. Grandma would write their information in a notebook she kept by the phone in the kitchen. Grandpa was an active member of the farmers market and local farmers association. Harvesting the crop at dusk well into the darkness, the night before the market and then getting up to use flashlights for last minute details, were the norm for us. I drove a flatbed Jeep truck at age 13 and would "toodle" down the road to check on hired hands picking beans and load up to take back for weighing and packing by the bushels.
Grandma had a famous Banana Bread and Zuchinni Bread that were always a sell out - many times she could only bake enough to fill pre-orders. Of course, Fresh Farm Eggs were also always in demand. So I have a background in the smaller farmers world. One that I moved far away from for many, many years and life has brought me back full circle - as is often the case with ones journey.
One thing I realized quickly that in order to "make it" (and what does that really mean anyway?) - one has to have many things in motion at once. Just as most things in life - everything has a season. While there will be a steady effect throughout the year in some things - there are explosive times for others and one needs to be ready to take full advantage of these. Fresh Farm Eggs are in demand year round - so a nice sized laying flock is often the start of any homesteading venture. Once the eggs are steadily flowing, one might move onto meat birds or maybe to hatching out chicks for replacement for themselves or to provide to others. That is one thing we do here. We believe in quality over quantity and hatch out in small batches from small flocks of colored egg layer breeds. We also provide fertile hatching eggs to others for their incubator or broody hens.
For meat and eggs we are building up our flock of dual purpose Heritage Delawares - a breed in need of conservation and part of the poultry history of America. Spring is definitely a time of chick explosion and if chicks are part of the plan - this is the time to have as many as possible - and that still won't be enough!
This year we added Pekin ducks as well - it was an opportunity that we were not in search of but so glad it came our way. We are looking forward to ducklings in the spring and also yummy duck eggs for baking with. They are also the duck breed of choice for meat purposes and we may try that out down the road as well.
We just hatched out a decent sized batch of Coturnix Quail over the last couple days. We have an outlet for the eggs for eating purposes.
Of course a garden is in order - one large enough to both currently feed your family and also to provide enough yield for freezing and/or canning to get you through winter months. Once that is established then adding on to be able to sell/market excess is the next step. My experience with my grandparents has taught me to pick a few things and do them really well and become known for them. Our future plans include a mushroom grove, sunflowers, lavender and blue lake beans. I also want to do a nice large patch of white pumpkins - I love to decorate with them. We use a lot of Black Oil Sunflower seeds as feed for both chickens and the rabbits so it is a natural fit.
We added meat rabbits after much research. We started out with a simple quad of New Zealand California cross and after getting out feet good and wet we quickly had to expand to keep up with demand - something that is still hard pressed for us. We added 2 Heritage breeds also in need of conservation: Silver Fox and Creme d'Argent. We are also adding a garden area for growing forage for the rabbitry next year. Other add ons are meal worms and eventually honey bees.
Having several things going on throughout the year keep the wheels oiled. Not as much as always needed but I feel we are off to a good start. I have read books on making $40k on 1/4 acre etc etc - I do think it is possible but it will take a lot of time and a ton pf patience to build up to that point unless one has the capital for instant growth. Marketing and building relationships is a must - being available after the fact and making oneself part of the farming community is imperative to a successful MicroFarming venture. There have been and still are many many bumps in the road and we are not trying to build Rome - so I do see a time when we can say - for us anyway - we made it :-)
So "within reason" for us means that we can provide healthy food options for our family, teach our children where food really comes from and the difference between such things like store bought eggs and our fresh farm eggs. How there is a moral issue in factory farmed animals and that we as caretakers of the animal kingdom have sadly lost our way as a whole. What we do believe is, that a natural disaster or terrorist attack could occur to stop the trucking in of goods - if that happened - how long could you feed your family from your freezer and pantry? Would you know who to locate for fresh milk and eggs in your community? Not everyone is as fortunate to live where these options exist in multitude and we are very thankful that we do.
I read so many books and online articles and videos - Harvey Ussery, Joel Salatin, Mel Bartholomew, Brett Markham and Gail Damerow are just a few of the authors whose wisdom I filled my head with.
I spent my teenage years on an agriculture farm - not huge but not small - my grandfather was well known in our neck of the woods for his large crops of 1/2 runner green beans, fabulous sweet corn (Silver Queen and Peaches n' Cream were my favorites) and Potatoes among other crops. He also kept bees and my cousins and I grew up chewing on fresh honeycomb - not realizing how fortunate we were and what a novelty it would be to most.
Calls from those wanting to get their orders in would come while snow was still on the ground. Grandma would write their information in a notebook she kept by the phone in the kitchen. Grandpa was an active member of the farmers market and local farmers association. Harvesting the crop at dusk well into the darkness, the night before the market and then getting up to use flashlights for last minute details, were the norm for us. I drove a flatbed Jeep truck at age 13 and would "toodle" down the road to check on hired hands picking beans and load up to take back for weighing and packing by the bushels.
Grandma had a famous Banana Bread and Zuchinni Bread that were always a sell out - many times she could only bake enough to fill pre-orders. Of course, Fresh Farm Eggs were also always in demand. So I have a background in the smaller farmers world. One that I moved far away from for many, many years and life has brought me back full circle - as is often the case with ones journey.
One thing I realized quickly that in order to "make it" (and what does that really mean anyway?) - one has to have many things in motion at once. Just as most things in life - everything has a season. While there will be a steady effect throughout the year in some things - there are explosive times for others and one needs to be ready to take full advantage of these. Fresh Farm Eggs are in demand year round - so a nice sized laying flock is often the start of any homesteading venture. Once the eggs are steadily flowing, one might move onto meat birds or maybe to hatching out chicks for replacement for themselves or to provide to others. That is one thing we do here. We believe in quality over quantity and hatch out in small batches from small flocks of colored egg layer breeds. We also provide fertile hatching eggs to others for their incubator or broody hens.
For meat and eggs we are building up our flock of dual purpose Heritage Delawares - a breed in need of conservation and part of the poultry history of America. Spring is definitely a time of chick explosion and if chicks are part of the plan - this is the time to have as many as possible - and that still won't be enough!
This year we added Pekin ducks as well - it was an opportunity that we were not in search of but so glad it came our way. We are looking forward to ducklings in the spring and also yummy duck eggs for baking with. They are also the duck breed of choice for meat purposes and we may try that out down the road as well.
We just hatched out a decent sized batch of Coturnix Quail over the last couple days. We have an outlet for the eggs for eating purposes.
Of course a garden is in order - one large enough to both currently feed your family and also to provide enough yield for freezing and/or canning to get you through winter months. Once that is established then adding on to be able to sell/market excess is the next step. My experience with my grandparents has taught me to pick a few things and do them really well and become known for them. Our future plans include a mushroom grove, sunflowers, lavender and blue lake beans. I also want to do a nice large patch of white pumpkins - I love to decorate with them. We use a lot of Black Oil Sunflower seeds as feed for both chickens and the rabbits so it is a natural fit.
We added meat rabbits after much research. We started out with a simple quad of New Zealand California cross and after getting out feet good and wet we quickly had to expand to keep up with demand - something that is still hard pressed for us. We added 2 Heritage breeds also in need of conservation: Silver Fox and Creme d'Argent. We are also adding a garden area for growing forage for the rabbitry next year. Other add ons are meal worms and eventually honey bees.
Having several things going on throughout the year keep the wheels oiled. Not as much as always needed but I feel we are off to a good start. I have read books on making $40k on 1/4 acre etc etc - I do think it is possible but it will take a lot of time and a ton pf patience to build up to that point unless one has the capital for instant growth. Marketing and building relationships is a must - being available after the fact and making oneself part of the farming community is imperative to a successful MicroFarming venture. There have been and still are many many bumps in the road and we are not trying to build Rome - so I do see a time when we can say - for us anyway - we made it :-)
Subscribe to:
Posts (Atom)